2.1. Creating and running a script
2.1.1. Writing and naming
A shell script is a sequence of commands for which you have a repeated use. This sequence is typically executed by entering the name of the script on the command line. Alternatively, you can use scripts to automate tasks using the cron facility. Another use for scripts is in the UNIX boot and shutdown procedure, where operation of daemons and services are defined in init scripts.
To create a shell script, open a new empty file in your editor. Any text editor will do: vim, emacs, gedit, dtpad et cetera are all valid. You might want to chose a more advanced editor like vim or emacs, however, because these can be configured to recognize shell and Bash syntax and can be a great help in preventing those errors that beginners frequently make, such as forgetting brackets and semi-colons.
 | Syntax highlighting in vim |
|---|---|
In order to activate syntax highlighting in vim, use the command :syntax enable or :sy enable or :syn enable You can add this setting to your .vimrc file to make it permanent. |
Put UNIX commands in the new empty file, like you would enter them on the command line. As discussed in the previous chapter (see Section 1.3), commands can be shell functions, shell built-ins, UNIX commands and other scripts.
Give your script a sensible name that gives a hint about what the script does. Make sure that your script name does not conflict with existing commands. In order to ensure that no confusion can rise, script names often end in .sh; even so, there might be other scripts on your system with the same name as the one you chose. Check using which, whereis and other commands for finding information about programs and files:
which -a script_name
whereis script_name
locate script_name
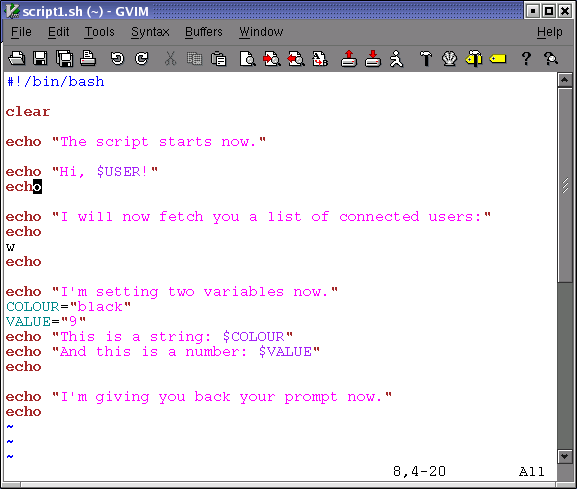
2.1.2. script1.sh
In this example we use the echo Bash built-in to inform the user about what is going to happen, before the task that will create the output is executed. It is strongly advised to inform users about what a script is doing, in order to prevent them from becoming nervous because the script is not doing anything. We will return to the subject of notifying users in Chapter 8.
Write this script for yourself as well. It might be a good idea to create a directory ~/scripts to hold your scripts. Add the directory to the contents of the PATH variable:
export PATH="$PATH:~/scripts"
If you are just getting started with Bash, use a text editor that uses different colours for different shell constructs. Syntax highlighting is supported by vim, gvim, (x)emacs, kwrite and many other editors; check the documentation of your favorite editor.
 | Different prompts |
|---|---|
The prompts throughout this course vary depending on the author's mood. This resembles much more real life situations than the standard educational $ prompt. The only convention we stick to, is that the root prompt ends in a hash mark (#). |
2.1.3. Executing the script
The script should have execute permissions for the correct owners in order to be runnable. When setting permissions, check that you really obtained the permissions that you want. When this is done, the script can run like any other command:
willy:~/scripts> chmod u+x script1.sh willy:~/scripts> ls -l script1.sh -rwxrw-r-- 1 willy willy 456 Dec 24 17:11 script1.sh willy:~> script1.sh The script starts now. Hi, willy! I will now fetch you a list of connected users: 3:38pm up 18 days, 5:37, 4 users, load average: 0.12, 0.22, 0.15 USER TTY FROM LOGIN@ IDLE JCPU PCPU WHAT root tty2 - Sat 2pm 4:25m 0.24s 0.05s -bash willy :0 - Sat 2pm ? 0.00s ? - willy pts/3 - Sat 2pm 3:33m 36.39s 36.39s BitchX willy ir willy pts/2 - Sat 2pm 3:33m 0.13s 0.06s /usr/bin/screen I'm setting two variables now. This is a string: black And this is a number: 9 I'm giving you back your prompt now. willy:~/scripts> echo $COLOUR willy:~/scripts> echo $VALUE willy:~/scripts> |
This is the most common way to execute a script. It is preferred to execute the script like this in a subshell. The variables, functions and aliases created in this subshell are only known to the particular bash session of that subshell. When that shell exits and the parent regains control, everything is cleaned up and all changes to the state of the shell made by the script, are forgotten.
If you did not put the scripts directory in your PATH, and . (the current directory) is not in the PATH either, you can activate the script like this:
./script_name.sh
A script can also explicitly be executed by a given shell, but generally we only do this if we want to obtain special behavior, such as checking if the script works with another shell or printing traces for debugging:
rbash script_name.sh
sh script_name.sh
bash -x script_name.sh
The specified shell will start as a subshell of your current shell and execute the script. This is done when you want the script to start up with specific options or under specific conditions which are not specified in the script.
If you don't want to start a new shell but execute the script in the current shell, you source it:
source script_name.sh
 | source = . |
|---|---|
The Bash source built-in is a synonym for the Bourne shell . (dot) command. |
The script does not need execute permission in this case. Commands are executed in the current shell context, so any changes made to your environment will be visible when the script finishes execution:
willy:~/scripts> source script1.sh --output ommitted-- willy:~/scripts> echo $VALUE 9 willy:~/scripts> |
